

How Seller Services Work
What a seller service is, how to set one up, and how to accept tokens on your own backend.
A seller service is a listing on the Skyfire Directory that offers a resource (i.e. MCP server, API, webpage, or Fetch.ai agent) in exchange for a KYAPay token. As a seller, you configure how restrictive access to that resource is: what identity a buyer agent must disclose, and whether reaching it costs anything at all.
A seller agent publishes and owns each seller service. See Seller Guide for creating a seller agent.
The full flow
A seller service follows the same path whether or not it charges for access.
- A buyer agent discovers your seller service, through the Skyfire Directory or another channel you point it to.
- It creates a token for your seller service, specifying your service's ID in the request, which addresses the token to your seller agent.
- It calls your service, passing that token in whichever header your backend expects,
kyapay-tokenby convention. - Your service reads that header and admits the request once the token checks out.
Two types of setup
Operating as a seller involves setup on Skyfire, and setup in your own backend.
Create your seller service and submit it for approval. You do this once, in the dashboard or through the API.
Verify every incoming token, charge it, and deliver. This is code you write, running on your servers.
Skyfire provides the infrastructure; your backend provides the judgment. Verifying and charging a token is yours to implement, which is what lets you decide what counts as valid access and how much it costs.
Setup on Skyfire
This assumes you already have a seller agent. See Seller Guide for creating one.
Create your seller service
Click Create Service, then fill in the seller service details.
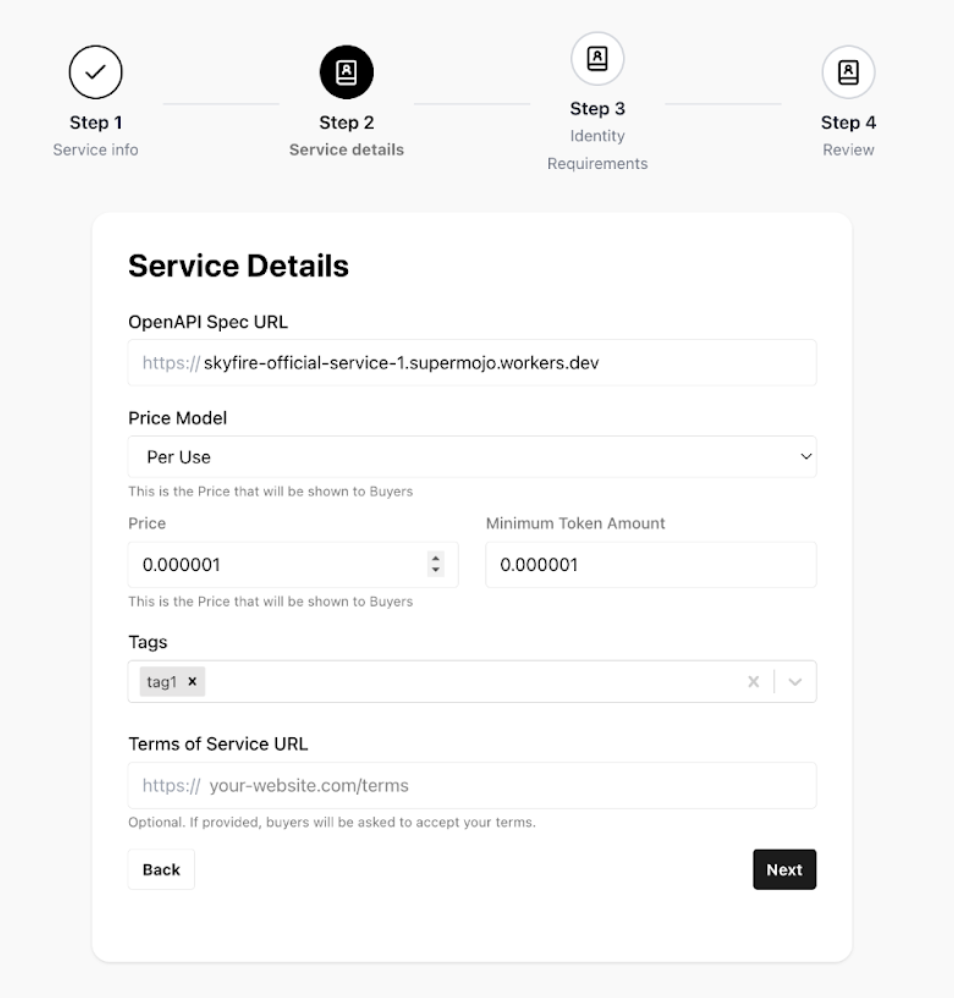
Add your MCP server, OpenAPI spec, or website by filling out the seller service details.
One seller agent can publish more than one seller service, each with its own price, accepted token types, and identity requirements.
What you configure on a seller service
| Field | Description |
|---|---|
| Name and description | Shown publicly in the Skyfire Directory |
| Type and URL | API (OpenAPI spec), website, or MCP server, plus the matching URL |
| Price and price model | Per use, per MB, or subscription, or free, if your seller service gates on identity rather than payment |
| Minimum token amount | The smallest token you will accept |
| Accepted token types | Which of kya, pay, and kya-pay a buyer agent can create for it |
| Maximum token lifetime | The longest expiry a buyer agent can request |
| Identity requirements | What a buyer agent must disclose before transacting |
| Terms of service | A link to your legal terms or usage policy |
Each seller service is identified by a unique ID. Buyer agents pass that ID when creating a token, and it appears in the token as the ssi claim, which is how you confirm a token was created for your seller service rather than another.
Set identity requirements
This step is optional. Without identity requirements, any buyer agent with sufficient funds can transact with your seller service.
To require identity, declare which fields a buyer agent must include in its kya or kya-pay token, and which kinds of buyer agents you accept: individuals, organizations, or both. See Identity Fields for the fields you can require, and Know Your Agent (KYA) for how verification works.
Submit for approval
Skyfire reviews each seller service before buyer agents can create tokens for it. Review typically takes 48 hours. The review confirms that the seller service works and is configured correctly, so tokens created for it validate as expected once buyer agents start calling. Once approved, your seller service is discoverable in the Skyfire Directory.
Setup in your backend
A seller service is built to receive a token with every request.
Assign a token header
KYAPay tokens are standard signed JWTs. The standard is for buyer agents to send them in the kyapay-token header, so enforce that header on your service.
Older integrations, or older buyer agents, may still use the deprecated
skyfire-pay-idheader instead.Enforce the dedicated
kyapay-tokenheader rather than reusing the standardAuthorizationheader. Many services already useAuthorizationfor their own authentication, and reusing it for KYAPay tokens can cause conflicts or unintended behavior.
Choose an integration path
Choose one of three integration paths below, depending on the level of control and security your service needs.
Recommended. Require the agent to include a token (kya, pay, and/or kya-pay) with each request, in the kyapay-token header.
Your service validates the token to authorize the agent, and may support charging flows tied to pay or kya-pay tokens. This is the simplest and most common integration pattern, and the one covered in Verify, deliver, and charge below.
Other integration paths may be possible. Contact [email protected] to discuss your specific use case.
Verify, deliver, and charge
Whichever path you choose, three steps happen in order once a token reaches your service.
- Verify the token. Confirm it is genuine and addressed to you before doing anything else. See Verify and Extract Data from Tokens and Handling Missing or Invalid Tokens for how to do so.
- Deliver. Deliver the service, tool, or resource once the token passes verification. Delivering before charging carries no risk of non-payment: creating a
payorkya-paytoken commits the amount against the buyer agent's wallet, and Skyfire guarantees settlement for a valid token. If you never charge it, that hold releases back to the buyer agent, so nothing is lost on either side. See Payments & Settlement. - Charge the token. This step applies only if your seller service accepts
payorkya-paytokens. Call Charge Token with your seller agent's API key.- The token's amount is a maximum, not a fixed charge. Charge what is owed.
- Partial and repeated charges are allowed, up to the token's value, which suits metered work.
- A
kyatoken carries no value and cannot be charged. - You can charge for up to 24 hours after a token expires, provided you validated it before expiry.
A request may also arrive with no token, an expired token, or one created for a different seller service.
Next steps
- For creating a seller agent and walking through setup end to end, see Seller Guide.
- For how money moves after a charge, see Payments & Settlement.
Updated 9 days ago