

Cloudflare
Add KYA token enforcement to a website or API you already serve through Cloudflare, using a Cloudflare Worker and optional WAF rules.
This guide is for teams already running on Cloudflare who want to add KYA token-based access control to their existing delivery stack. It uses a Cloudflare Worker function, a small serverless function that runs at Cloudflare's edge before a request reaches your origin. The Worker reads the kyapay-token request header, validates the incoming kya token, and then either returns an error or lets the request through to your website or API.
For what a kya token is and why validation works this way, see How it works in Enforce KYA-Based Access Control.
Before you start: you'll need a Cloudflare account with Workers enabled, and your website or API already served through Cloudflare. A reference implementation is available in the skyfire-solutions-cloudflare-news-crawler-demo repo.
Components
Your setup is made of up to three parts:
- The Worker validates the
kyatoken. It runs on every request that matches its route. - A route tells Cloudflare which requests the Worker runs on. For a website, that's a hostname pattern such as
dev.example.com/*. For API Gateway, it's an endpoint route pointing at the Worker. - A WAF rule (Bots only setups) decides which requests must carry a token at all. It blocks likely bots that arrive without a
kyapay-tokenheader before the Worker runs, so human visitors never need a token.
Identify your setup
Two questions determine which setup below applies to you.
Cloudflare CDN, if you're serving a website through Cloudflare's proxy. Cloudflare API Gateway, found under Endpoint Management in the dashboard, if you manage API endpoints there.
Bots only, letting human visitors through while enforcing tokens on bots. Bots and humans (all), requiring a valid token from every caller, including people in a browser.
What happens to a request depends on which setup you choose:
| Request | Bots only (Worker + WAF rule) | Bots + humans (Worker only) |
|---|---|---|
| Human in a browser, no token | Passes through to your website or API | Blocked by the Worker |
| Bot, no token | Blocked by the WAF rule | Blocked by the Worker |
| Bot or human with an invalid token | Blocked by the Worker | Blocked by the Worker |
| Bot or human with a valid token | Passes through to your website or API | Passes through to your website or API |
Bots + humans means ordinary visitors in a browser don't send a
kyapay-tokenheader, so with this setup they'll see a JSON error instead of your pages. Choose it only for content that should be reachable by token holders alone, such as an agent-only API. If you want your website to keep working for people, choose Bots only.
Follow the matching setup
Select the tab below that matches your product, then the sub-tab that matches which traffic should require a token.
Use this if your website is served through Cloudflare's CDN, meaning its DNS record in Cloudflare is proxied (orange cloud).
1. Create and configure your Worker
-
(Extracted from Cloudflare's Create a new Worker project) Create a Worker project on your machine with C3 (
create-cloudflare), Cloudflare's command-line tool for setting up new Workers projects. You'll need a Cloudflare account and a recent version of Node.js (see Wrangler's system requirements). In a terminal, run:npm create cloudflare@latest -- kya-workerkya-workeris the name of the project folder and Worker; use any name you like. C3 then asks a few questions. Answer them like this:C3 asks Choose Why What would you like to start with? Hello World example Gives you a minimal Worker that you'll replace with the example code. Which template would you like to use? Worker only You only need a Worker, without static assets or a framework. Which language do you want to use? TypeScript The example code is written in TypeScript. Do you want to use git for version control? Your choice Not needed for this guide. Do you want to add an AGENTS.md file...? Your choice Helps AI coding tools; not needed for this guide. Do you want to deploy your application? No You'll replace the code and add configuration first, then deploy in the next step. When C3 finishes, move into the new folder; run every later command from here:
cd kya-workerThe folder contains these files you'll work with:
src/index.ts: the Worker's code, currently a "Hello World!" example. You'll replace it with the example code in the next step.wrangler.jsonc: the Wrangler configuration file, which holds the Worker's name, which file is its code and its environment variables. You'll edit it in step 3. Older projects, or projects created another way, may havewrangler.tomlinstead; step 3 covers both.package.jsonandnode_modules: the project's npm dependencies, including Wrangler, the CLI you'll use to deploy.
C3 also installs Wrangler and may open your browser to log in to Cloudflare.
-
From inside the project folder, install the packages the example Worker code imports:
npm install validator jose @cloudflare/workers-typesjoseverifies the token's signature,validatorchecks the claims inside it, and@cloudflare/workers-typesprovides TypeScript types for the Workers runtime. -
Add these environment variables to your Wrangler configuration file. They tell the Worker where to fetch Skyfire's public signing keys and which issuer and algorithm a valid token must have. Use the same values in every environment.
If your project has
wrangler.jsonc, add avarsobject at the top level. If your project is older and haswrangler.toml, add a[vars]section instead:"vars": { "BACKEND_API_URL": "https://api.skyfire.xyz", "OFFICIAL_SKYFIRE_JWT_ALGORITHM": "ES256", "OFFICIAL_SKYFIRE_JWT_ISSUER": "https://app.skyfire.xyz" }[vars] BACKEND_API_URL = "https://api.skyfire.xyz" OFFICIAL_SKYFIRE_JWT_ALGORITHM = "ES256" OFFICIAL_SKYFIRE_JWT_ISSUER = "https://app.skyfire.xyz"
2. Choose which traffic requires a token, and deploy
This path adds a Cloudflare WAF rule, a request-filtering rule that runs at Cloudflare's edge before your Worker. The rule blocks requests that Cloudflare scores as likely bots and that don't carry a token header. Human visitors aren't affected by the rule and don't need a token.
Deploy the Worker
-
Copy the example Worker code into your project's entry file (
src/index.ts).What this code does: if a request has a
kyapay-token(or the deprecatedskyfire-pay-id) header, it verifies the token and rejects it if invalid. If there's no token header, it passes the request through to your site, because the WAF rule has already decided that the request didn't need one.Adapt it to your needs if necessary.
-
Deploy from your project folder:
npx wrangler login   # first time only
npx wrangler deploy
Wrangler bundles the TypeScript and its dependencies for you, so there's no separate build step. See Deploy your project for details.
Add the WAF rule
-
In the Cloudflare Dashboard, select your domain and go to Security → Security rules.
-
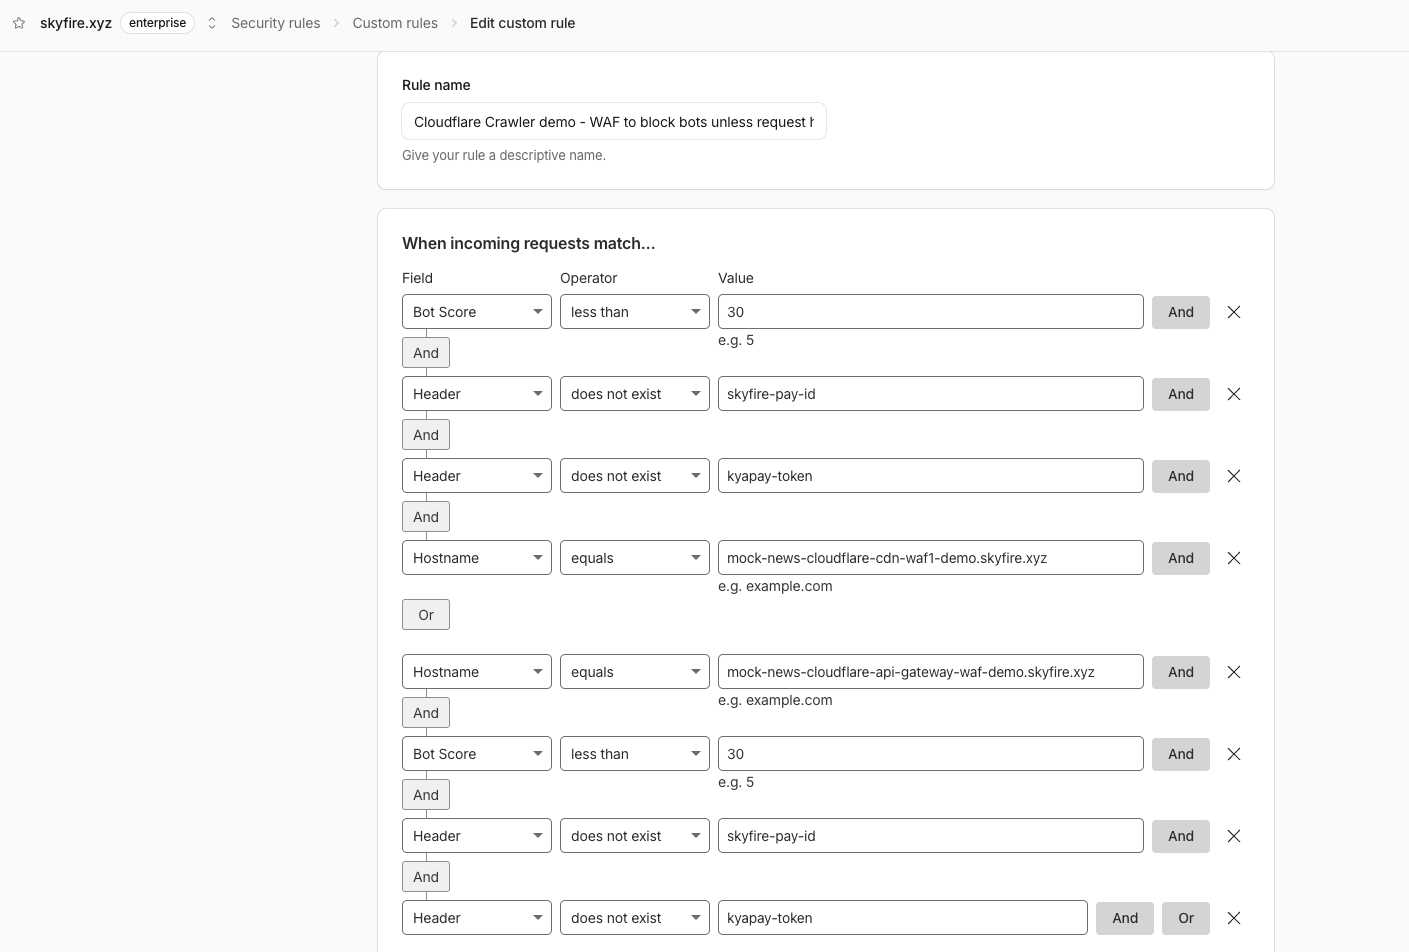
Create a custom rule. It should match requests that are on the hostname you're protecting, likely bots according to Cloudflare's Bot Score, and missing both the
kyapay-tokenheader (and the deprecatedskyfire-pay-idheader). -
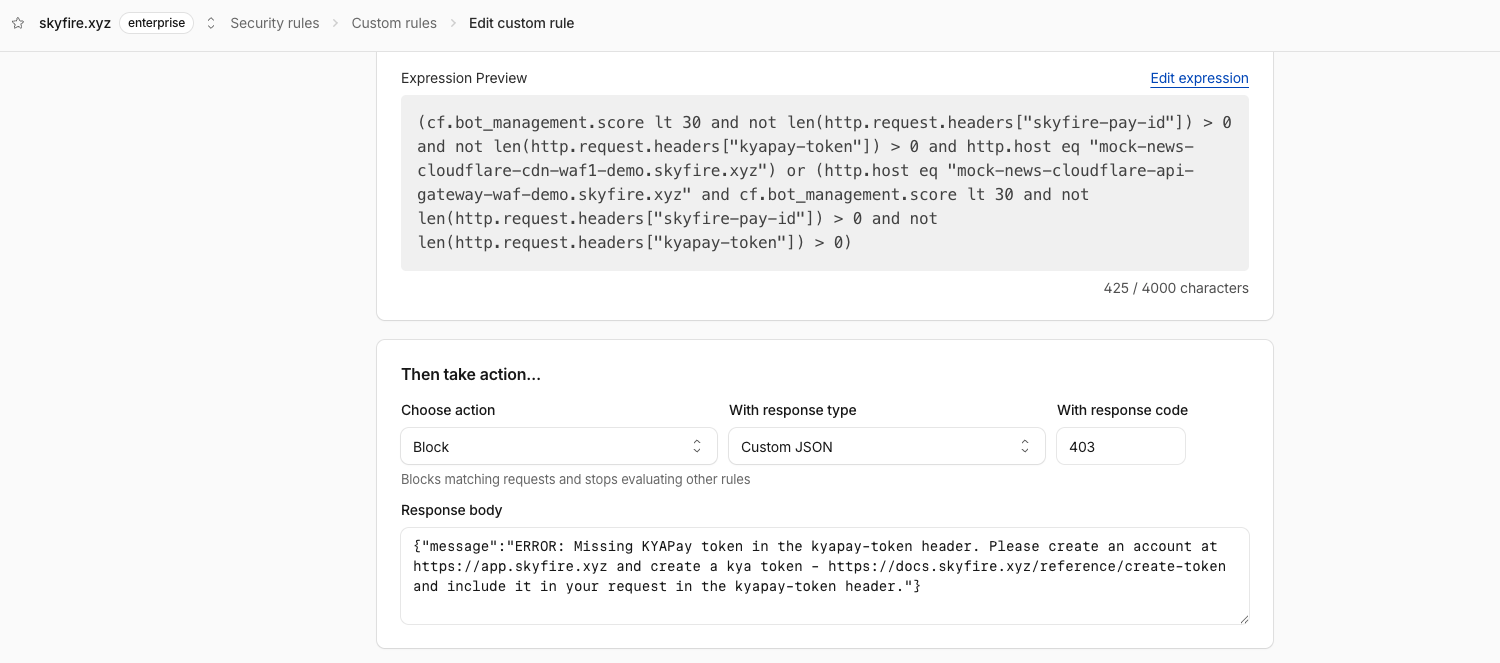
Set the rule's action to Block.
Expression you can paste into the Edit expression view, with your own hostname:
(http.host eq "dev.example.com"
  and cf.bot_management.score lt 30
  and not cf.bot_management.verified_bot
  and not any(lower(http.request.headers.names[*])[*] eq "kyapay-token")
  and not any(lower(http.request.headers.names[*])[*] eq "skyfire-pay-id"))
How each line works:
cf.bot_management.score lt 30: Cloudflare scores every request from 1 (almost certainly automated) to 99 (almost certainly human). Below 30 is Cloudflare's "likely automated" range. Raise or lower the threshold to make the rule stricter or looser.not cf.bot_management.verified_bot: exempts verified bots such as search engine crawlers, so they can keep indexing your site. Remove this line if you want those bots to need a token too.- The two header checks let any request that carries a token header past the rule, so the Worker can validate it.
Example rule:
Why both parts are needed: the WAF rule only checks whether a token header is present, not whether the token is valid. The Worker does the validation. Without the Worker, a bot could send any value in the header and get through. Without the WAF rule, the Bots only Worker would let every request without a token through, bots included.
3. Connect your Worker to your website
A deployed Worker doesn't do anything to your site until you give it a route, a URL pattern that tells Cloudflare to run the Worker on matching requests.
- In the Cloudflare Dashboard, open your Worker and go to Settings → Domains & Routes.
- Select Add → Route, choose your zone (domain), and enter a pattern that covers the pages you want protected. For example,
dev.example.com/*covers every path ondev.example.com.
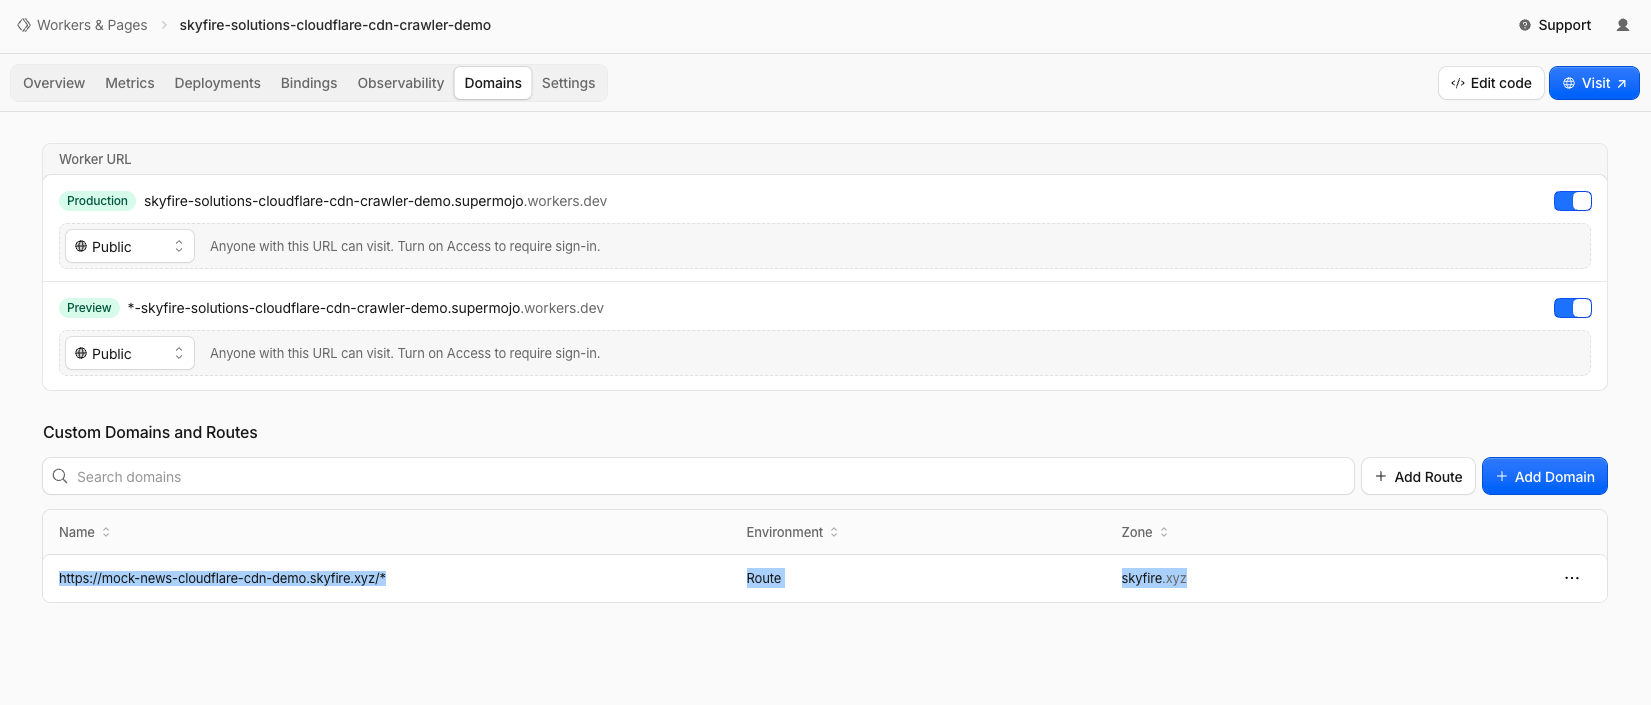
Once the route is saved, the Worker runs on every matching request. When it lets a request through, fetch(request) at the end of the Worker forwards it to your origin as normal.
If you don't have Bot Management
The Bot Score (cf.bot_management.score) used in the Bots only WAF rule requires a Cloudflare Enterprise plan with Bot Management. A rule with only the header checks blocks every request without a token, humans included.
Alternatives:
- Super Bot Fight Mode (Business, or Enterprise without Bot Management): turn it on under Security → Bots to block automated traffic, add a WAF custom rule that skips Super Bot Fight Mode for requests carrying a
kyapay-tokenheader, and deploy the Bots only Worker. Without the skip rule, agents are blocked even with a valid token. Note that it applies to your whole domain and may occasionally challenge real visitors. - Agent-only hostname or path: use the Bots + humans setup on something like
api.example.comorexample.com/agents/*, and leave human-facing pages without a route. This works on any plan.
See Cloudflare's bot plans for what your plan includes.
Error responses
Return the status codes and messages recommended in Handling Missing or Invalid Tokens: 401 for a missing token and 403 for an invalid one.
- Worker: your Worker builds the response itself, so set the status and body in its code.
- WAF rule: in the Bots only setup, the WAF rule blocks bots without a token before your Worker runs. To return the recommended status and message instead of Cloudflare's default block page, set a custom response on the rule's Block action.
Demo
References
Updated about 2 hours ago